> ## Documentation Index
> Fetch the complete documentation index at: https://docs.bluplai.com/llms.txt
> Use this file to discover all available pages before exploring further.
# Users
> Invite teammates, assign roles, and manage who has access to your Bluplai workspace.
 ## Why you're here
Admin is where you get control and scalability without adding friction, and Users is the starting point. Bluplai is a shared space between your team and your customer, so who has a seat and what role they carry is the first thing to get right. You can onboard a partner in minutes with access only to relevant modules, or bring in a guest with a scoped Viewer role for collaboration without overexposure. That reduces onboarding time by 50%+ and minimizes permission errors — governance without slowing execution.
*Control and simplicity can coexist — and scale together.*
## What you'll see
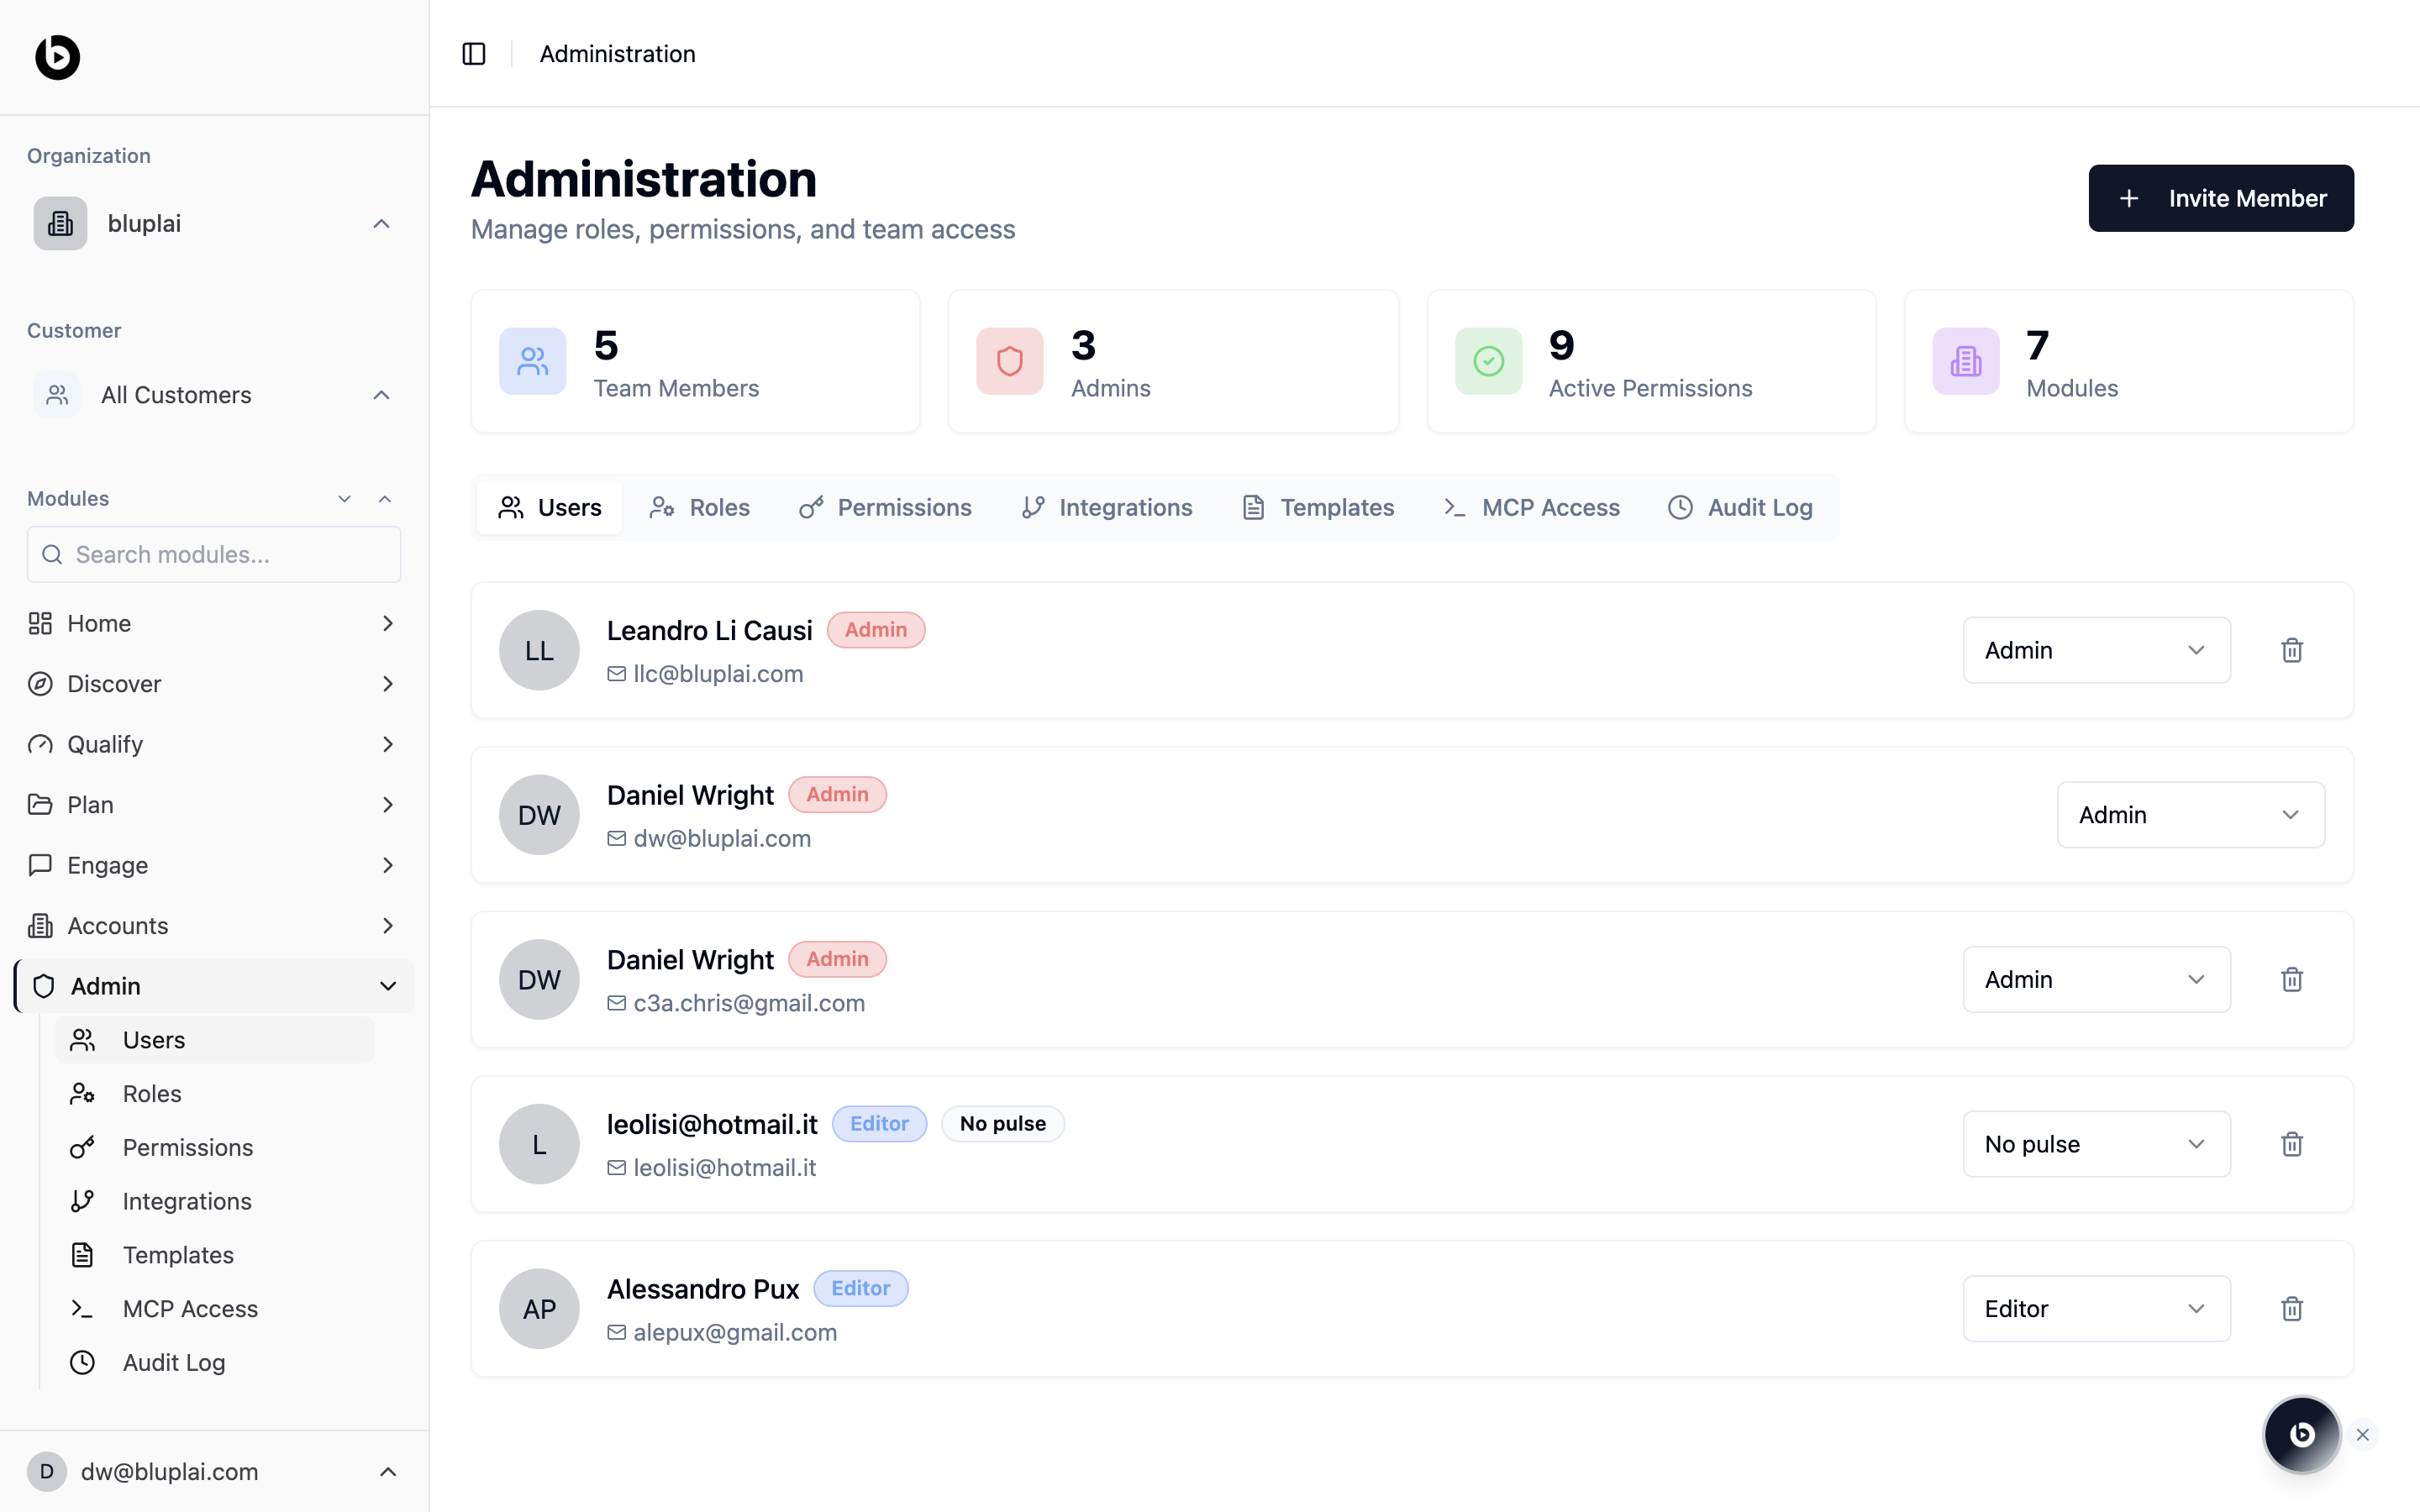
At the top, four counters summarise the workspace: Team Members, Admins, Active Permissions, and Modules. Below the tab row, each member has a card with their name, email, a role badge (Admin, Editor, Viewer, or a custom role like "No pulse"), a role dropdown, and a trash icon to remove them.
Use **Invite Member** in the top right to add someone by email. Change a role inline with the dropdown on the right of each row. The role you pick here is the member's default across the workspace; fine-grained access per module lives on the Permissions tab.
## When to use it
* A new hire joins Sales, CS, Marketing, or Partners and needs a seat
* Someone changes team and their default role needs to shift
* A contractor's engagement ends and you need to revoke access
* You want a quick headcount of admins vs. editors vs. viewers
## Inviting a member
## Why you're here
Admin is where you get control and scalability without adding friction, and Users is the starting point. Bluplai is a shared space between your team and your customer, so who has a seat and what role they carry is the first thing to get right. You can onboard a partner in minutes with access only to relevant modules, or bring in a guest with a scoped Viewer role for collaboration without overexposure. That reduces onboarding time by 50%+ and minimizes permission errors — governance without slowing execution.
*Control and simplicity can coexist — and scale together.*
## What you'll see
At the top, four counters summarise the workspace: Team Members, Admins, Active Permissions, and Modules. Below the tab row, each member has a card with their name, email, a role badge (Admin, Editor, Viewer, or a custom role like "No pulse"), a role dropdown, and a trash icon to remove them.
Use **Invite Member** in the top right to add someone by email. Change a role inline with the dropdown on the right of each row. The role you pick here is the member's default across the workspace; fine-grained access per module lives on the Permissions tab.
## When to use it
* A new hire joins Sales, CS, Marketing, or Partners and needs a seat
* Someone changes team and their default role needs to shift
* A contractor's engagement ends and you need to revoke access
* You want a quick headcount of admins vs. editors vs. viewers
## Inviting a member
 ### Why you'd invite one
Every person with a seat in Bluplai — internal teammate or guest — comes in through this same dialog. Getting the invite right is how you keep the workspace safe: the right email lands with the right role, and everyone else stays out. It's also the single place where you signal whether someone is internal or external, which shapes how they appear in Permissions.
### How to invite one
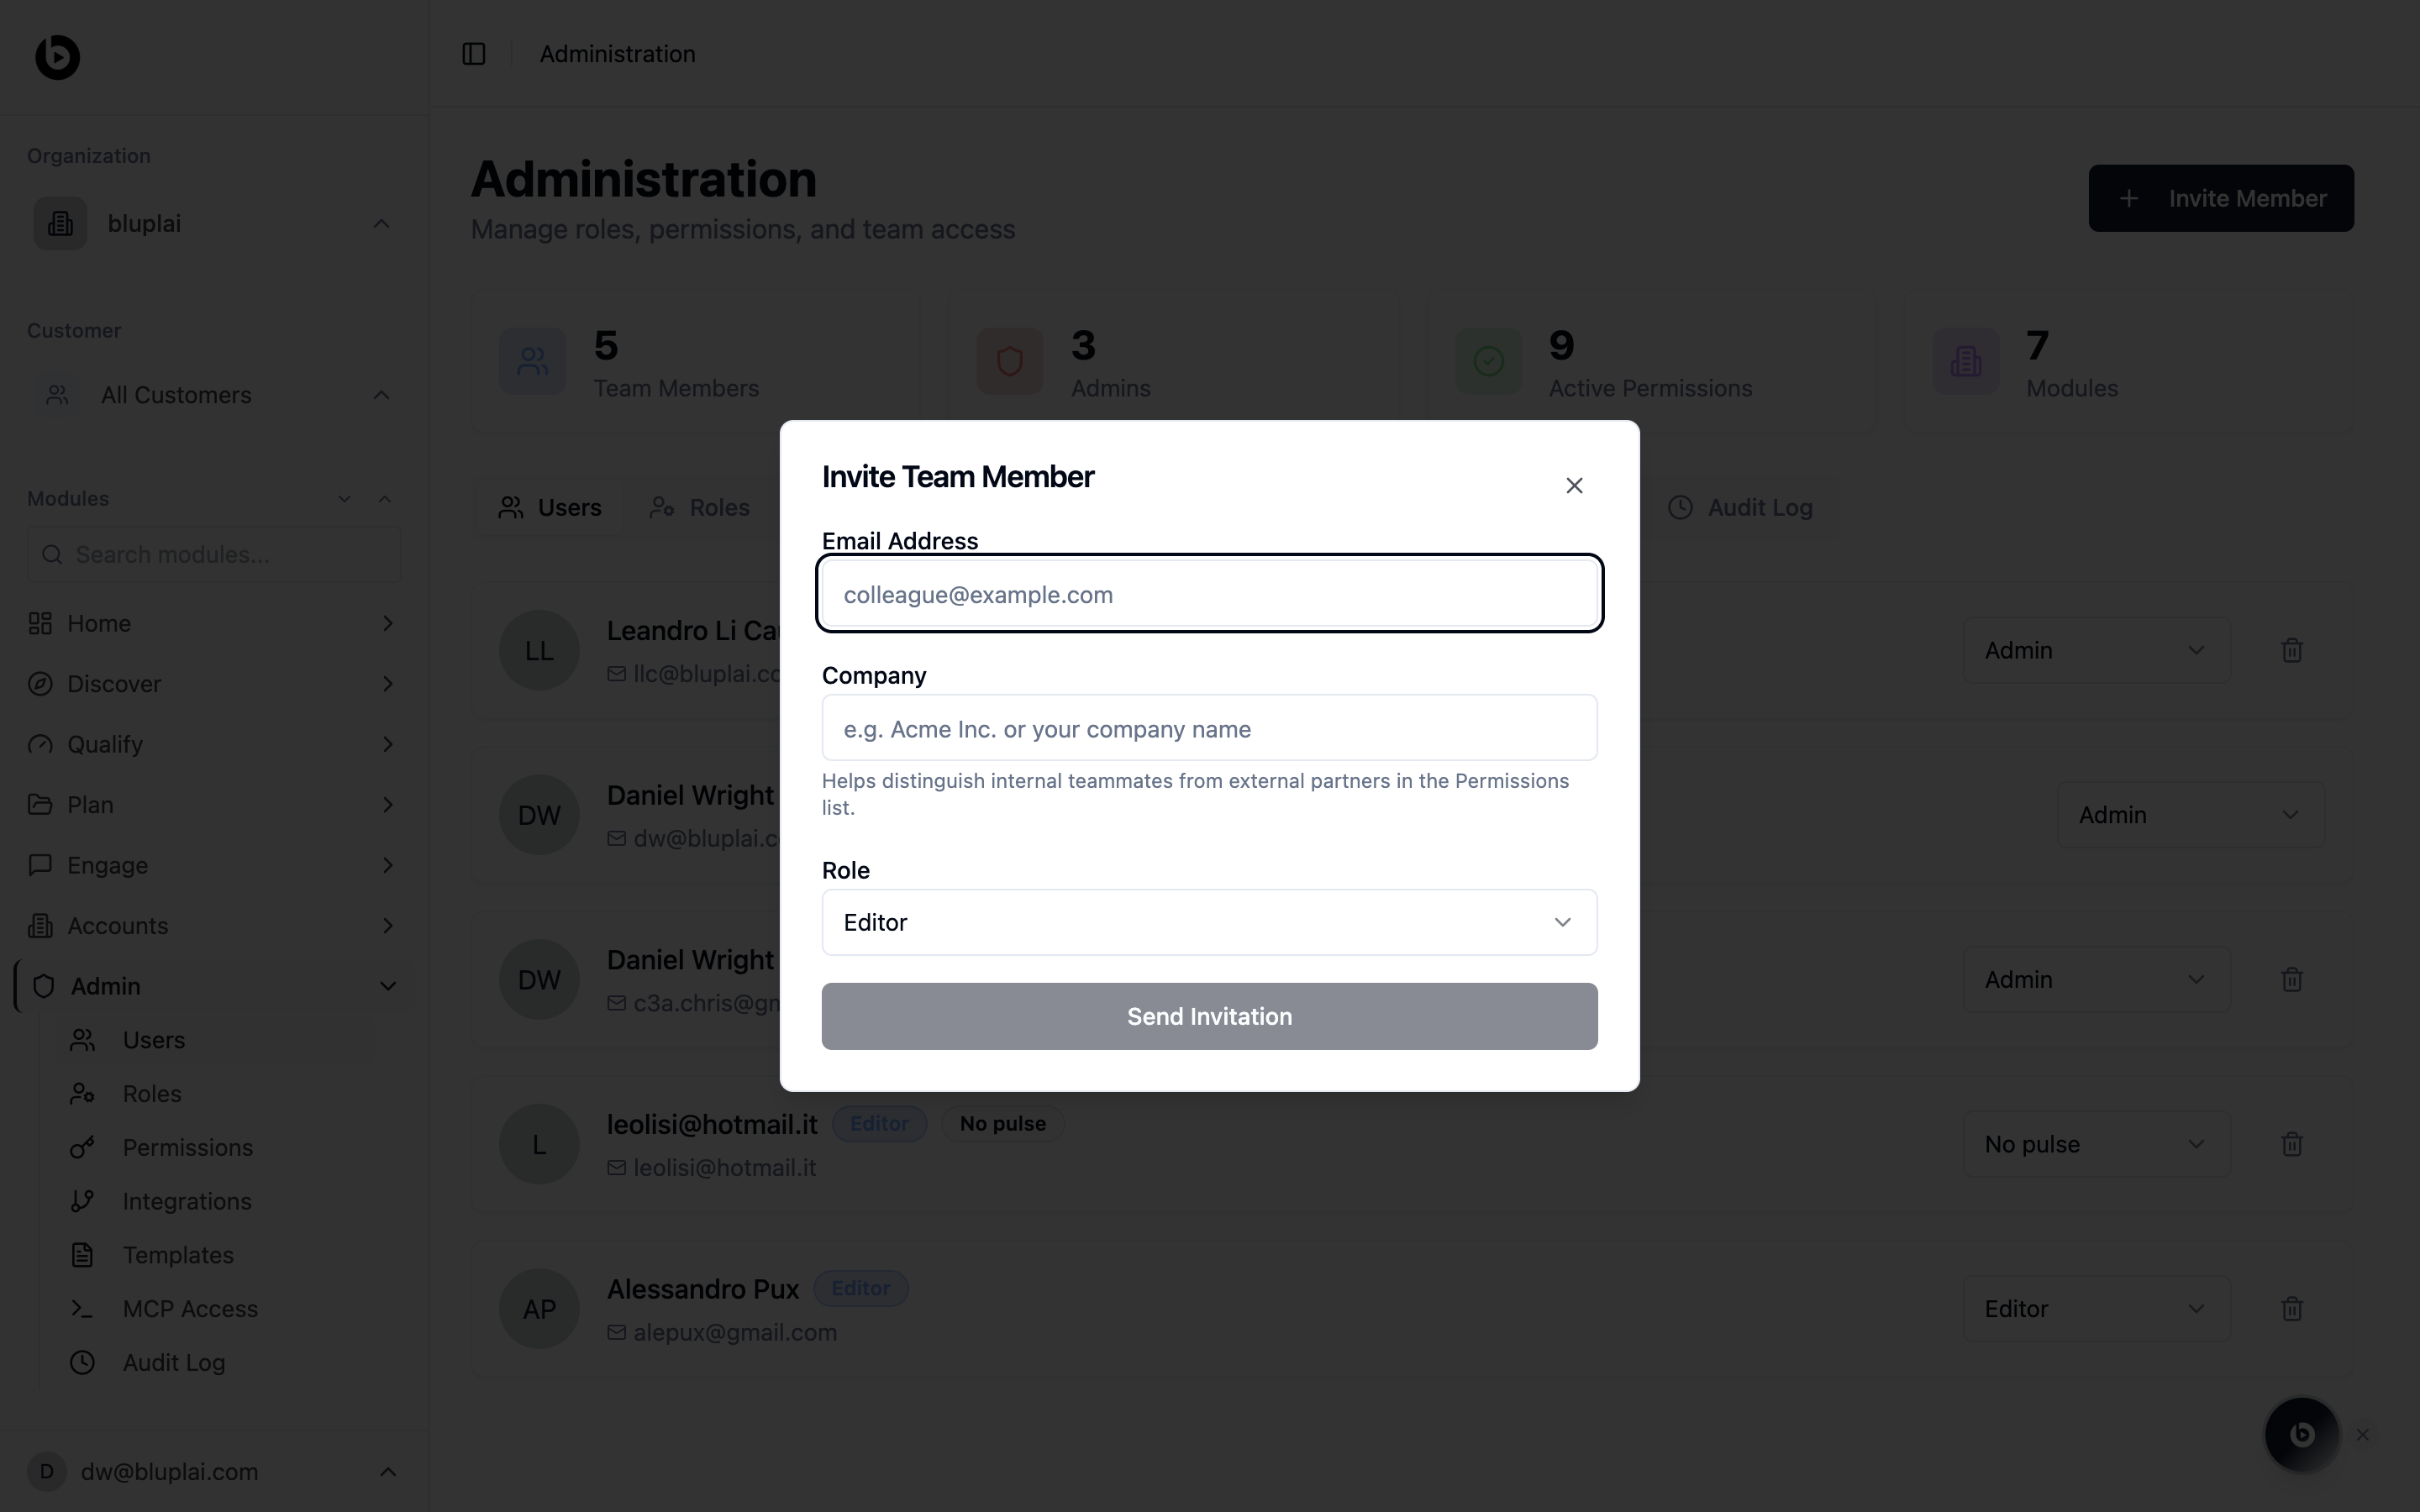
From `/admin/users`, click **Invite Member** in the top right.
* **Email Address** — the email the invite will be sent to
* **Company** — the company the person belongs to. This helps distinguish internal teammates from external partners in the Permissions list
* **Role** — the default role for this member: Admin, Editor, Viewer, or any custom role you've defined
Click **Send Invitation**.
### Inviting a guest
Bluplai doesn't have a separate guest-invite flow — you bring guests in through the same **Invite Member** dialog. The **Company** field is the signal that marks them as external, and the role you pick is how you keep their access scoped.
From `/admin/users`, click **Invite Member**. There's no separate flow for guests — this one dialog covers both internal teammates and guests.
Fill **Email Address** with the email of the person on the account's side you're inviting.
Fill **Company** with the name of the account — not your own. This is how the Permissions list distinguishes internal teammates from external partners, so getting it right here is what makes the split visible downstream.
Assign a scoped role so the guest only sees what you want them to:
* **Viewer** is a safe read-only default for most guest invites
* For something more tailored, create a custom role on the [Roles](/admin/roles) tab that only grants access to the modules you want the guest to reach (for example, Plan and Engage) and pick it from the Role dropdown
Click **Send Invitation**. The guest receives the same invite email as an internal teammate and accepts via `/invite/accept?token=…`.
After they accept, fine-tune what they can see on the [Permissions](/admin/permissions) tab — narrow them down to a single account workspace if needed, and flip off any modules the role still exposes.
Guest invitations count against your workspace's license. Each paid seat includes a bounded number of guest invites — the exact figure depends on your plan. If you hit the limit, upgrade the seat or free one by removing an inactive guest from the Users tab.
### What happens after
The invitee gets an email with an accept link (`/invite/accept?token=…`). Once they accept, they appear in the Users tab with the role you chose and show up in the Permissions list labelled by the Company you set. You can change their role inline from the row or refine their module-level access from Permissions.
## Next
Review the three base roles and build custom roles that map to how your teams actually work.
Drill into per-module, per-account access for every member of the workspace.
### Why you'd invite one
Every person with a seat in Bluplai — internal teammate or guest — comes in through this same dialog. Getting the invite right is how you keep the workspace safe: the right email lands with the right role, and everyone else stays out. It's also the single place where you signal whether someone is internal or external, which shapes how they appear in Permissions.
### How to invite one
From `/admin/users`, click **Invite Member** in the top right.
* **Email Address** — the email the invite will be sent to
* **Company** — the company the person belongs to. This helps distinguish internal teammates from external partners in the Permissions list
* **Role** — the default role for this member: Admin, Editor, Viewer, or any custom role you've defined
Click **Send Invitation**.
### Inviting a guest
Bluplai doesn't have a separate guest-invite flow — you bring guests in through the same **Invite Member** dialog. The **Company** field is the signal that marks them as external, and the role you pick is how you keep their access scoped.
From `/admin/users`, click **Invite Member**. There's no separate flow for guests — this one dialog covers both internal teammates and guests.
Fill **Email Address** with the email of the person on the account's side you're inviting.
Fill **Company** with the name of the account — not your own. This is how the Permissions list distinguishes internal teammates from external partners, so getting it right here is what makes the split visible downstream.
Assign a scoped role so the guest only sees what you want them to:
* **Viewer** is a safe read-only default for most guest invites
* For something more tailored, create a custom role on the [Roles](/admin/roles) tab that only grants access to the modules you want the guest to reach (for example, Plan and Engage) and pick it from the Role dropdown
Click **Send Invitation**. The guest receives the same invite email as an internal teammate and accepts via `/invite/accept?token=…`.
After they accept, fine-tune what they can see on the [Permissions](/admin/permissions) tab — narrow them down to a single account workspace if needed, and flip off any modules the role still exposes.
Guest invitations count against your workspace's license. Each paid seat includes a bounded number of guest invites — the exact figure depends on your plan. If you hit the limit, upgrade the seat or free one by removing an inactive guest from the Users tab.
### What happens after
The invitee gets an email with an accept link (`/invite/accept?token=…`). Once they accept, they appear in the Users tab with the role you chose and show up in the Permissions list labelled by the Company you set. You can change their role inline from the row or refine their module-level access from Permissions.
## Next
Review the three base roles and build custom roles that map to how your teams actually work.
Drill into per-module, per-account access for every member of the workspace.